|
|
|
AES
Product Article
Current Events
Don't forget about high current measurements
| No matter where you
turn in the automotive repair industry today, you hear about the "magic" of
using a low current probe in conjunction with a labscope or graphing multi-meter.
Sometimes referred to as current ramping, it seems to be a hot topic. There is, of course,
good reason for this. Current ramping offers a window into circuit dynamics that can
provide huge amounts of useful diagnostic information.
With all of this talk about
measuring low current though, it almost seems like some technicians have forgotten about
using a current probe to measure higher current circuits. The fact is that high current
measurement is a very useful tool. Let’s examine some of the possibilities that it
offers.
 Figure
1 Figure
1
A typical high current probe with large jaws for clamping around
large conductors.
|
| To measure high
current you will need a high current probe, sometimes called a
high amp probe. Figure 1
shows a typical high current probe. This type of probe is built to measure high current
levels, usually in the hundreds of amps. Low current probes on the other hand, are
designed to measure extremely low levels of current, down to only a few
milli-amps. In
fact, low current probes usually aren’t even physically large enough to clamp around
a high current conductor such as a battery cable.
The current probe you select should
also be
of the type that is intended for use with a multi-meter or labscope. Some probes have
their own digital numeric display and can’t be hooked up to a meter. These
stand-alone probes are great tools but they can’t provide the same amount of
information as a probe used with a labscope or graphing multi-meter. Selecting the right
probe for the job is essential.
Both high and low current probes output a voltage in
response to current flow through a conductor. Therefore, it must be connected to a voltage
input on your meter. Some meters may have an input labeled AMPS. This is for an intrusive
low current test, DO NOT connect a current probe to this input. The voltage output by the
probe has a specific calibration. Most high current probes (but not all) use a calibration
of 1mV per amp. This means that every milli-volt displayed on the meter represents one
amp. By the way, most probes use a battery to generate their output voltage. Always be
sure that this battery is fresh and strong.
What is Current?
Another consideration when measuring current flow is to be
fully certain that you understand what it represents. If it’s not clear to you, think
of current as the "volume" of electricity flowing through the circuit. This is
similar to the volume of water flowing through a pipe. You’re probably very familiar
with measuring voltage. Voltage can be thought of as the "pressure" of the
electricity in the circuit. Using the liquid analogy again, voltage is similar to the
pressure of water in a pipe.
Knowing the circuit voltage and current flow, you can
determine the amount of power the circuit is consuming. This value is usually expressed in
Watts and can be calculated by multiplying the voltage (in volts) by the current flow (in
Amps). This power directly relates to the amount of work that the circuit is performing.
Since the voltage in most automotive circuits is relatively constant we can normally just
look at current flow to get a good idea of the amount of work being done. This has some
very powerful implications for automotive diagnosis.
OK, now that I’ve touched on what current flow
represents and the tools needed to measure it, let’s look at some of the applications
where current measurement is useful. To determine the applications, we must remember that
we are focusing on high current levels. There aren’t too many high current circuits
in today’s vehicles. In fact there are really only two: the starter system and the
charging system. I suspect that we will encounter more in the future as electric hybrid
and pure electric vehicles become more common. For now though, we’ll have to focus
just on the starting and charging systems.
Charged up
For the first example, let’s take a look at how we
can use a low current probe to test the charging system. In the past you’ve probably
wheeled some sort of battery and charging system tester over to the car to do this.
That’s no longer necessary in many cases if you own a lab scope or graphing
multi-meter and a high current probe. Take a look at figure 2.
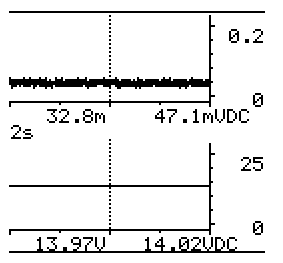 Figure 2 Figure 2
Charging system voltage and current.
|
It shows the charging system output from an early 90’s GM truck. The bottom graph
shows the charging voltage, which is around 14V. The top graph shows the charging current.
Remember, the probe is outputting a voltage of 1mV per amp. Since we see roughly 40mV on
the graph, we can calculate that the alternator is charging around 40A.
The signal is a
bit noisy, making it difficult to determine the exact current value but pinpoint accuracy
isn’t really necessary in this case. To perform this test, the voltage leads were
simply hooked to the battery and the current probe was placed around the negative battery
cable. During the test, all of the lights, the stereo, and the A/C were turned on to
created a load on the charging system.
Figure 2 was
captured using the Snap-on Vantage Power graphing meter. It was a heck of a lot easier to
use than wheeling over that big charging system tester. If you want to look even deeper
into the charging system, you can use your meter to look at the alternator diode pattern.
After all, a bad diode can cause serious problems.
The easiest way to look at a diode
pattern is to set
your meter to AC input coupling then connect the leads to the alternator output and
ground. After adjusting the time base and voltage level you should get a nice display of
the diode pattern. I used the Snap-on Vantage for this article though and it doesn’t
offer AC input coupling. To overcome this I used an AC filter from AES. This filter
removes the DC portion of the signal and allows you to focus on the always-changing
portion (and you thought AC only stood for alternating current). In addition, I decided to
stick with the current probe theme and use my low current probe to look at the diode
pattern.
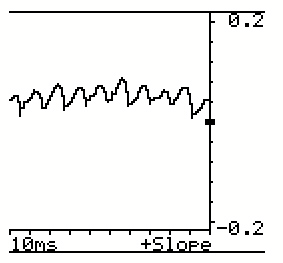 Figure 3 Figure 3
Alternator Ripple
|
Figure 3 shows the results. To capture this pattern, the AC filter was simply connected
between the meter and the low current probe. The probe was then placed around the
alternator B+ wire. This example shows a good diode pattern. Again, there was no need to
get out that huge analyzer. Starter
Circuits
So what about starter current? No problem, the high
current probe has it covered. I’m sure that most everyone is familiar with using
a starting/charging analyzer to look at starter draw. You’ve probably found
many bad starter motors and other problems this way. Older analyzers had an analog display
that used a needle to indicate voltage and current while newer ones have a digital numeric
display. Today’s labscopes and graphing meters though offer a whole new level of
detail compared to traditional equipment when used for this type of testing.
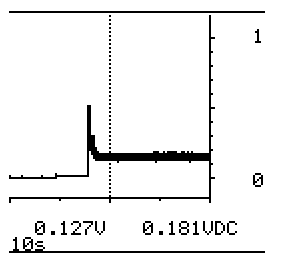 Figure 4 Figure 4
Starter Current
|
Figure 4 shows the starter current while cranking on a 1991 S-10 pickup. Notice how the starter
draws near 500A when cranking first starts. (Don’t forget: the current probe being
used outputs 1mV/A). Since you’re not used to seeing this, you may think it’s a
problem at first but it’s not. This initial surge of current represents the work
required to get the stationary engine rotating. Once it’s up to cranking speed, it
levels of at around 150-180A. This starter circuit is just fine.
If the current had
remained excessively high or low, we would know that there is a problem with the circuit
such as a bad starter or resistance from corrosion or loose connections, etc. Don’t
forget that most lab scopes and graphing meters have 2 and sometimes even 4 measurement channels. You can
easily measure and display the system voltage and current simultaneously.
There is one more useful piece of information that starter current
provides that you may have never even realized. That information is relative compression.
Think about it, every time a piston is forced up against compression, it takes work.
Current represents work doesn’t it? Well, it stands to reason that if you have a way
to observe current on a small time scale then you should see the effect that each
cylinder’s compression stroke has on starter current while the engine is cranking.
The current probe and labscope or graphing multi-meter and a high current probe are the
tools that can do this.
Performing a relative compression test is easy. You simply
select a time and voltage range on your meter that will give you the desired display,
disable the engine from starting then crank. Figure 5 shows an example of a relative
compression test from a GM V-6.
 Figure 5 Figure 5
Relative Compression
|
Each peak represents the effect of compression from an individual cylinder. We can’t
determine a pressure value for compression from this but that’s fine. We are
measuring relative compression. We want to see a fairly even contribution form each
cylinder. In this example, every cylinder seems to be contributing relatively equally.What would you see on the display if one cylinder had low
compression? Lower compression requires less work to overcome so there will be a lower
current requirement for that cylinder. This should result in one of the peaks being
shorter on the display. Figure 6 shows what one cylinder with low compression looks like.
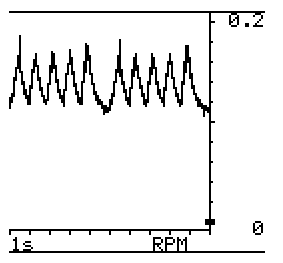 Figure 6 Figure 6
Relative Compression with one bad cylinder
|
For this example, the number 2 spark plug was removed form a V-6 engine. Of course, this
created zero compression and it was very easy to spot. The missing peak is obvious. Still,
this technique can be used to spot cylinders with weak but not dead cylinders.
The difference in the height of the peaks is always a dead giveaway
of a cylinder with lower compression than the others.
Relative compression
testing is very useful. I remember working in a shop where the manager insisted that we
perform a compression test whenever we did a "tune-up" (I hate the term tune-up
by the way. What is there to "tune" any more?). This was a good idea except for
the fact that he expected you to have the tune-up done in half an hour. Sometimes it takes
that long just to remove one spark plug. The relative compression test is the perfect time
saving solution for this sort of thing. It’s also useful when you suspect a weak
cylinder but you aren’t sure which one it is. You can perform a relative compression
test to isolate the offending cylinder then do a traditional compression test on it. These
are only a couple applications, I’m sure that you can think of many more.
Triggernometry
So you can spot a weak cylinder but how do you no which
one it is? Once again, labscopes and graphing meters make this easy by using an external
trigger (Figure 7).
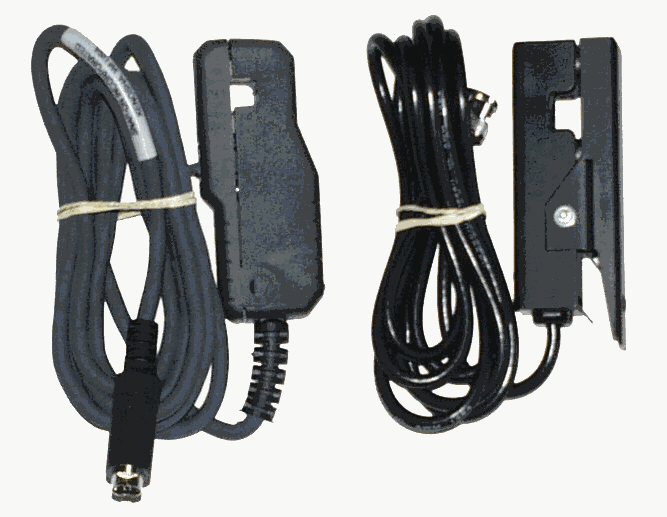 Figure 7 Figure 7
Two examples of external triggers
|
The external trigger is placed around a spark plug wire and you must adjust the
scope to work with it. Doing this means that the scope will not start "drawing"
to the screen until the external trigger requirements are met.
In figure 6, the Vantage
was set to trigger off of the RPM pickup that was placed on the number one plug wire. This
means that every time the screen is updated, the #1 cylinder is first on the screen. All
you have to do is follow the firing order to determine the particular cylinder represented
by each peak.
Since the external trigger is placed on a plug wire, the ignition system
must be functional while performing this test. In order to keep the car from starting
then, the fuel system must be disabled. Disabling the fuel system also minimizes any
dieseling effects that can cause invalid results when doing a relative compression test on
a hot motor.
External triggers can be used with just about any meter that has more than
one input channel. They are usually available form the company that manufactured the meter
and from the aftermarket as well. It’s a very useful accessory; I urge you to buy one
and learn how to use it.
Managing it all
There’s one other not so obvious benefit to using
your labscope or graphing meter for this type of testing That benefit is
information. You’ll notice
that I captured and saved the images from every test for this article. You can do the same
using a PC and a screen capture program (figure 8).
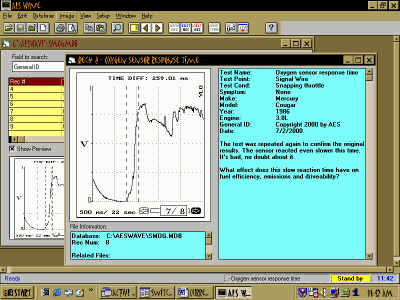 Figure 8 Figure 8
The AES Wave Information Management Software
|
Doing this allows you to save the results of your testing for your own reference or as proof of
your diagnosis and repairs. This can then be printed out and given to the customer and stored
on your PC’s hard drive in case you need to refer to it in the future.
We are in the information age after all and traditional types of testing equipment doesn’t always
offer this kind of flexibility.There’s one
last thing that I need to mention. All of the examples shown here were captured using the
Snap-on Vantage Power Graphing Meter. I chose to use it simply because I wanted to learn a
little more about it, not because it’s the only tool that can do this sort of thing.
The fact is, just about any labscope or graphing multi-meter can be used for this kind of
testing. There is absolutely no reason not to use yours.
What’s the bottom line? That’s pretty much up to
you. There’s no excuse for buying the powerful diagnostic equipment available today
and then letting it collect dust in your toolbox. Take advantage of what’s out there.
High current measurement is a very useful and powerful tool. It’s only a small part
of the enormous potential that today’s diagnostic tools offer though; don’t be
afraid to explore it all. |
|
Written by Chuck Walker
Chuck is an applications specialist here at AES. He
is an ASE certified Master Automobile Technician and holds a California Smog Check
Technician license. He has extensive field experience solving tough driveability problems
and diagnosing & repairing automotive electrical, electronic and computer systems.
Copyright 2000 by AES (Automotive Electronics
Services) |
Back to Top
|
|
|
|
 Still
Can't Find it? Still
Can't Find it?
Thousands of products listed at Universal Tools!
Hand tools, Body tools, Shop equipment, Air
tools, etc...
Information in this document is subject to change without
notice.
AES Wave! is a claimed trademark of Automotive Electronics Services, Inc.
Other products and companies referred to herein are trademarks or registered trademarks of
their respective companies or mark holders and are not associated with AES.
AESsupport@aeswave.com
Copyright © 1995-2004 Automotive Electronics Services, Inc.
All rights reserved.
Revised: April 06, 2004.
|


